Outer space embroidery design – refresh your old backpack
Want to refresh your old backpack? An outer space embroidery design is just the thing to make something old like new again!
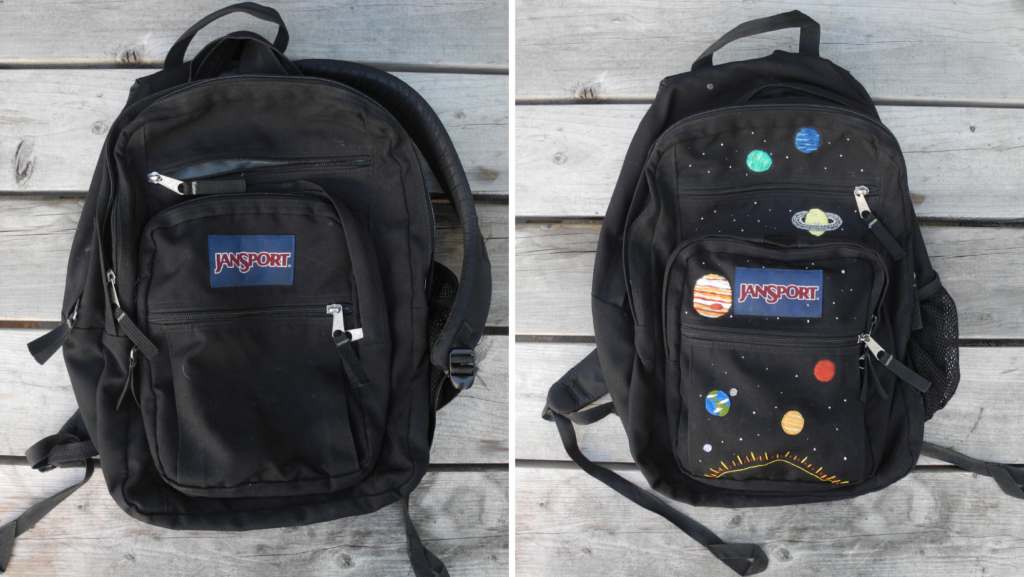
My old backpack
If you are like me, somewhere in your house is an old backpack that you have had for as long as you can remember. I have had the same black backpack for at least twenty years. Although it is a bit worn in places and one of the zippers is stuck, it is still my go-to backpack.
My backpack and I have been through a lot together. It was filled to the brim with books and binders through middle school, high school, college, college, then college again. It is the first bag I grab whenever I go on a trip. With everything my backpack has done for me, I decided to give it some love back.
Outer Space Embroidery Design
I quickly settled on embroidering an outer space design. Since the backpack was plain black, it made the perfect background for stars and planets.
I decided to use our solar system as the main focus. I like having a clear direction in my projects, so knowing exactly what comes next is an easier process for me than trying to do a random space design.
It also makes for the perfect opportunity to use different embroidery stitches and techniques, depending on which planet I was working on. This kept the project interesting and gave lots of texture to the finished piece.
Sketching the space embroidery design
I sketched out the approximate locations and sizes of The Sun and each planet to make sure each one would have room.
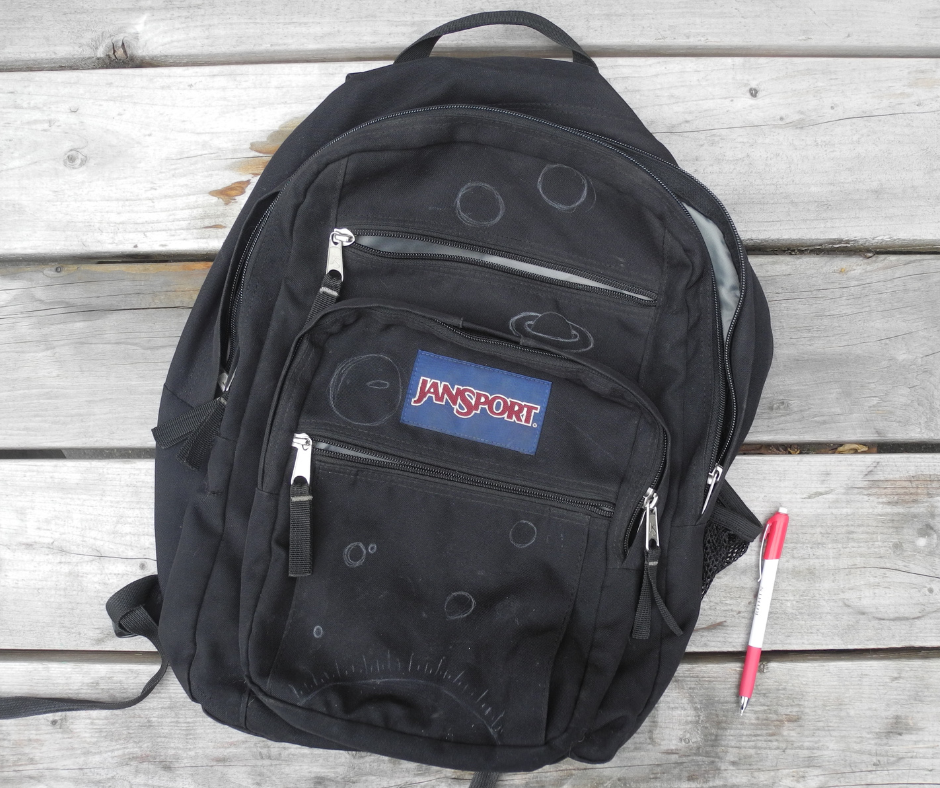
I used a chalk pencil to sketch out this design. This ended up being a great choice because it stood out nicely on the black canvas fabric while I was embroidering, but was either covered up by thread or rubbed away by the time I finished embroidering each element of the design. I wasn’t too precise with my lines because I knew the chalk sketch was more like guidelines anyway.
I did have to go back over some of the lines with chalk if I rubbed too much off while working on other parts of the design, but it didn’t slow down the overall process much.
Embroidering the solar system on a backpack
An embroidery project on a backpack came with some unique challenges that you wouldn’t have if you were embroidering on a flat piece of fabric.
It was difficult to get access to the back side of the fabric to be able to work stitches comfortably. I found I was working inside of pockets and I could only get my hand in on one side, instead of all around, so I had to be creative in how I held my needle.
Between the thick fabric, pockets, and zippers it was tricky if not downright impossible to use an embroidery hoop. Because I didn’t have the tension a hoop provides it was difficult to keep even tension on the stitches and prevent puckering. The thick canvas of the backpack provided enough support to still get results I was ultimately happy with.
Another factor when embroidering on a backpack is having the back of the work exposed on the inside of the bag. If you have ever looked at the back of a work of hand embroidery you know the threads and tails are the perfect place to snag on something being put in the bag and ruin the embroidery on the front.

The best way to protect it would be to cover it with another piece of fabric. If I had embroidered this backpack for someone else I would be sure to protect the stitches. Since it is just for me, I was careful to leave the backs as neat as possible and I will know to be careful when I use the pockets with embroidery on them.
After sorting through my stash of embroidery floss that I have no idea how I acquired in the first place, I was ready to get stitching!
The Sun

Starting at the bottom of the backpack I placed The Sun. I kept this design very simple; a row of back stitches for the border and straight stitches for the rays. Keeping the sun minimal lets the different planets stand out more.
The Inner Planets

I used a lot of variety in the embroidery design of the inner planets.
Mercury, being such a small, rocky planet was very quick to embroider. I chose a blue-grey thread and sewed a spiral of split stitches. This gave a textured look that I thought was appropriate for a rocky planet.
Next was Venus. Venus is also a rocky planet but doesn’t look like it due to its thick atmosphere. Using a satin stitch inside of a vine stitch border let me blend colors to mimic the Venusian atmosphere.
Earth and The Moon ended up being one of my favorite parts of the space embroidery design. After doing a vague sketch of the continents I filled in the land with a satin stitch. The sea was filled with a spiraling vine stitch that gave the ocean a sense of movement, like the ocean currents. A couple of patches of white satin stitch on top made the clouds.
The Moon was very similar to Mercury, only I used a chain stitch instead of a split stitch. In the end, it wasn’t noticeably different. I found the split stitch much easier to sew. If I went back and did this embroidery design again I would use split stitch for both.
I had the perfect rusty red embroidery floss for Mars, so I kept the embroidery very basic since the red planet would be recognizable anyway. I made a “rocky” surface with a small backstitch and filled in the rest with a satin stitch.
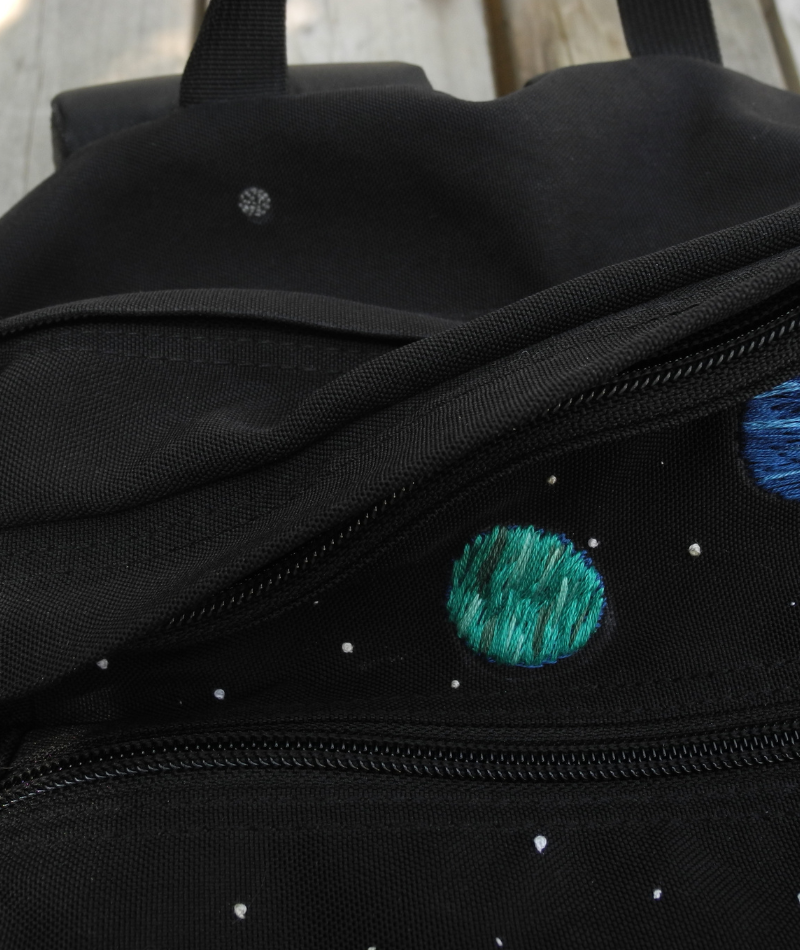
Gas giants
I scattered the placement of the four gas planets across other pockets on the backpack.
Jupiter got a prominent spot right next to the backpack’s logo. Using the same rusty red color from Mars, I started with the instantly recognizable red storm. This was created using a spiral vine stitch, just like the oceans on Earth. I used a variety of thread colors to create horizontal bands.

I started embroidering the bands using a simple satin stitch but quickly found that the stitches would be too long. This would make the stitches not lay nicely and be easy to snag. I switch to doing a long, erratic vine stitch. This gave a similar look to a satin stitch but with shorter, safer stitches. I don’t know if this is a true embroidery stitch or technique, but it worked for me and I am very happy with the result.
The rings of Saturn were another highlight of this embroidery journey. Most of my embroidery to this point was done using three threads of embroidery floss. For the rings, I used all six strands of embroidery floss. Embroidering concentric rings using different stitch patterns and lengths in varying shades of grey really made the rings stand out.

A crafting tragedy
Next up was Neptune. I used the same technique I started using when I was embroidering Jupiter. I picked a dark blue background and overlaid a lighter blue.
Just when I had finished off the last stitches on Neptune and was admiring how nice it had turned out I realized my mistake.
Neptune is not the 7th planet in the Solar System… it’s the 8th.
Realizing my mistake I had three options:
- Leave it as it was and hope no one questioned it. After all, Neptune and Uranus have similar colors.
- Rip out all the work I had just done and embroider Uranus in its proper place.
- Embroider Uranus directly over the misplaced Neptune.
I chose option three. Using the quasi-satin stitch technique and a mixture of teal thread I went ahead and put Uranus right on top of Neptune. I worked the stitches at a 45(ish) degree angle since Uranus spins on a different axis from all of the other planets.

I recreated my original Neptune again, this time in its correct position.
outer Space embroidery design secret
Even though it is no longer a true planet, being a child of the 90s, I couldn’t help put but a small secret pluto on the very top of the backpack, just for me.
(Please don’t tell Neil Degrasse Tyson).
Stars galore!
The final thing I did was scatter white French knots and small straight stitches all around the black background for all the stars in the sky. They were very quick to add, but it really made the whole space embroidery design come together.
I had another mini-tragedy when embroidering stars on the front pocket. I was just about to tie off a thread when I noticed I had sewn through the edge of the pocket.

Fortunately, I had only done this at the end of the thread, so I was able to pull out a couple of stitches and tie it off.
Would I use a space embroidery design on a backpack again?
I am by no means an embroidery expert. I did not use perfect techniques or best practices and I definitely made mistakes along the way. More than once I realized there was a better way I could have done something halfway through.
Even though I didn’t always know what I was doing I had a ton of fun embroidering this outer space design on my old backpack. I did struggle for a moment when I realized my Neptune/Uranus mix-up, but after taking a quick pause, I got back to it and the finished product was just the way I imagined it from the beginning.
I would 100% embroider another backpack and you should give it a try too!

If you would like to see more embroidery projects, click here.
What would you embroider on your old backpack? Let me know in the comments below!
Love this! I probably have three of these old backpacks floating around my house somewhere, and a teenage daughter always interested in trying a new project. Thanks for the inspiration 😊