The Learn to Knit Scarf – FREE Absolute Beginner Knitting Tutorial
If you have always wanted to learn to knit but aren’t sure where to start, you’ve found the right place! This free beginner knitting tutorial will guide you through everything you need to know to start knitting!

When I first learned to knit, I had an experienced knitter nearby to ask questions and check my work to see where I was twisting or dropping stitches. Without this insight, I wouldn’t have even known where to start.
Not everyone is as lucky as I was, but I want to help even that playing field. So consider me your official knitting friend, and I am here to help you get started with this beginner knitting tutorial.
This is not a typical knitting pattern. This beginning knitter tutorial is designed for people who have never picked up a pair of knitting needles to learn how to knit, and have a cozy scarf to wear at the end. I will walk you through what you need to do, from start to finish, with some helpful hints along the way.
If, at any point, you aren’t sure what I’m talking about, you can take a look at this handy guide to knitting terms, or this post to get a general overview of knitting.
So go grab some yarn and a pair of knitting needles and let’s get knitting!
Jump Ahead in the Beginner Knitting Tutorial
- Supplies
- Cast On
- Knitting
- Troubleshooting
- Joining in Yarn
- Cast Off
- Weave in Ends
- Finishing Touches
- Printable Pattern
What You’ll Need for the Beginner Knitting Tutorial
Knitting Needles
To follow this beginner knitting tutorial, you’re going to need some knitting needles. If you have a pair of knitting needles already, they will probably work.
Knitting needles come in different sizes. Usually you will see a sizes millimeters and a standard size. For a super simple scarf like this, any needle from about a size 4.5 mm/US 7 to 8 mm/US 11 will work. The smaller the needles you use, the smaller your stitches, and the tighter your fabric will be. If you use a bigger needle, you’ll have bigger stitches and a scarf with more drape.
The sample scarf was knit on 6 mm/US 10 straight knitting needles.
For your first knitting project, you can use either straight knitting needles, or circular knitting needles. however, I would not recommend using double pointed needles for your first project. You don’t want to worry about stitches sliding off the back of the needles.
As your knitting skill grows, and you try more patterns, you’ll start to learn what size needles you like to use, what style, and what material type works best for you. For now, use whatever is easy to get your hands on.

Yarn
Like the knitting needles, keep the yarn simple. You don’t need to get anything fancy (unless you want to).
What you’re looking for:
- Around worsted weight (about 200 yards per 100 grams)
- A color you like, but not too dark (you want to be able to see your stitches)
- Feels nice against your skin
- At least 400 yards of yarn (more yarn = more scarf)
- Nothing too fluffy!
Extras
Tapestry Needle
Once you are done knitting your scarf, you’ll have yarn ends sticking out at the beginning and end of your work, and anywhere you joined in a new ball of yarn.
To hide those ends, you’ll need a tapestry needle, which is just a large, blunt tipped needle, to tuck in the ends.
Crochet Hook
If you would like to add some tassels to your scarf, a crochet hook makes it quick and easy, but that is completely optional.
Like your knitting needles, the size doesn’t have to be exact. Somewhere around a size 4.0mm/G to a 6.0mm/J will work.
Let’s Make a Scarf!
Cast On 30 Stitches
The first thing you need to do is get some stitches on your knitting needles. My favorite beginner cast on is a long tail cast on.

To cast on stitches with a long tail cast on, make a slip knot about twenty inches away from the start of your yarn and slip it onto one of your needles.
Then, hold this knitting needle in your right hand with the tip pointing toward your left hand and drape the ends of the yarn over your left hand, so the tail end is over your thumb, and the working end is over your left hand.
To make more stitches, move the tip of your knitting needle through the loop around your thumb and pull the yarn around your pointer finger through this loop. Then pull tight.
For a more detailed look at easy cast ons, click here.
You’ll want to cast on about 30 stitches. Fewer stitches will make a narrower scarf, more stitches will make a wider scarf.

When you first cast on stitches, it will look narrower than the actually knitting will be once you knit more rows.
Whatever number of stitches you cast on (be sure to count the slipknot at the beginning), make a note of how many stitches you are working with. You’ll want to make sure this number stays the same as you knit your scarf.
Knit Until Desired Length
Now we knit!
You’ll want the knitting needle with all of your cast on stitches in your left hand, and your knitting needle without stitches in your right hand.
To make a knit stitch, put the right needle into the first loop on the left needle, wrap the yarn around counterclockwise, and pull the yarn through the left needle stitch, onto the right needle.
There are different knitting styles, but the two you will most commonly see in the US are English style and Continental style.

The difference between the two is which hand moves the yarn.

For most knitters, one style will be easier to learn than the other. If you try one way, and it just isn’t working for you, try the other method and you may have better results.
For more detailed instructions on how to make a knit stitch in different styles, click here.
Once you have reached the end of your cast on stitches, you’ve knit your first row! Now turn your knitting needle over, and knit the next row!
Keep knitting row after row until your scarf is as long as you want it, or you run out of yarn.
When you first start knitting, your stitches will be uneven and your edges won’t be straight. You might twist some stitches, drop stitches, or somehow add stitches, and that is all OK! In fact, it’s fantastic!
Doing it wrong the first time, or first twenty times, is how to learn! Keep going, and your knitting will get better, I promise.
If your first attempt becomes too much of a mess, you can take your stitches off your needles, pull out your stitches, and start over. That’s the beauty of yarn, you can use it over and over again!
Troubleshooting
No beginner knitting tutorial is complete without taking a look at how things are going to go wrong. There’s no getting around it, only through it. But you don’t have to worry, there is always a way to fix things.
Remember, if it gets too out of control, you can always start over and try again!
Extra Stitches
Ideally, for this pattern, you want the number of stitches to stay the same each row. Sometimes you’ll stop and count your stitches only to find you have more than you started with.
Beginning of the Row
A common place this happens is at the beginning of a row. If you aren’t careful, you can accidently pull up the stitch from the previous row, which will look like two stitches instead of one.

To avoid this problem, make sure your working yarn wraps counter-clockwise, around the bottom of your knitting needle, not over the top. Gently pulling your knitting down, just under the first stitch, can make it easier to see if you have the working yarn going the right way.
If you do end up with a couple of extra stitches, your scarf will still be perfectly functional, but the edges might not be straight.
Yarn Overs
The other common way to accidentally add a loop of yarn between two stitches, called a yarn over. This will look like a hole in your knitting.

In lace knitting, yarn overs are added intentionally to make a design.
If you notice that you added a yarn over a few rows back, you can leave it and call it a design choice! Just like before, the scarf will still be perfectly functional and hold together. No one will notice an extra stitch here or there. Every knitting project has a mistake somewhere. That’s the beauty of handmade things!
Dropped Stitches
Another common thing to happen while knitting is for stitches to slip off the needles when you aren’t looking. You’ll notice you don’t have as many stitches on your needles as you should, and there might be a gap where stitches have come undone, like a run in tights.

This is a bigger issue than extra stitches, because left unattended, this stitch will keep unraveling all the way down your scarf.
There are a few ways you can take care of this problem, depending on how bad it is, and how much it bothers you.
Quick Pickup
If you notice your dropped stitch right away, you can quickly grab it with your knitting needles and keep going. Even if it was a row or two below where you are working, it won’t be super noticeable, and it will keep the stitch from unraveling.

Crochet Hook
If the dropped stitch is several rows back, you can use a small crochet hook to grab it, and then loop it through the extra yarn on each row until you get back up to your needles. This will save your stitch and keep you from having to rip your stitches out. Your stitches might look a bit tighter where you pick up the dropped stitch.

Tie It Off
Another option is to take a bit of your yarn, thread it through the stitch, and tie it off. Then, when you weave in ends, you can weave these in as well.

It is a fast fix, and keeps your knitting from unraveling.
Go Back
Like any other issue you run into, you can always undo your knitting and re-knit.
Twisted Stitches
The final issue I want to touch on here is twisted stitches. This is when you end up knitting stitches with a small twist at the bottom. This usually happens if you knit off of yarn from the back of the knitting needle instead of the front.
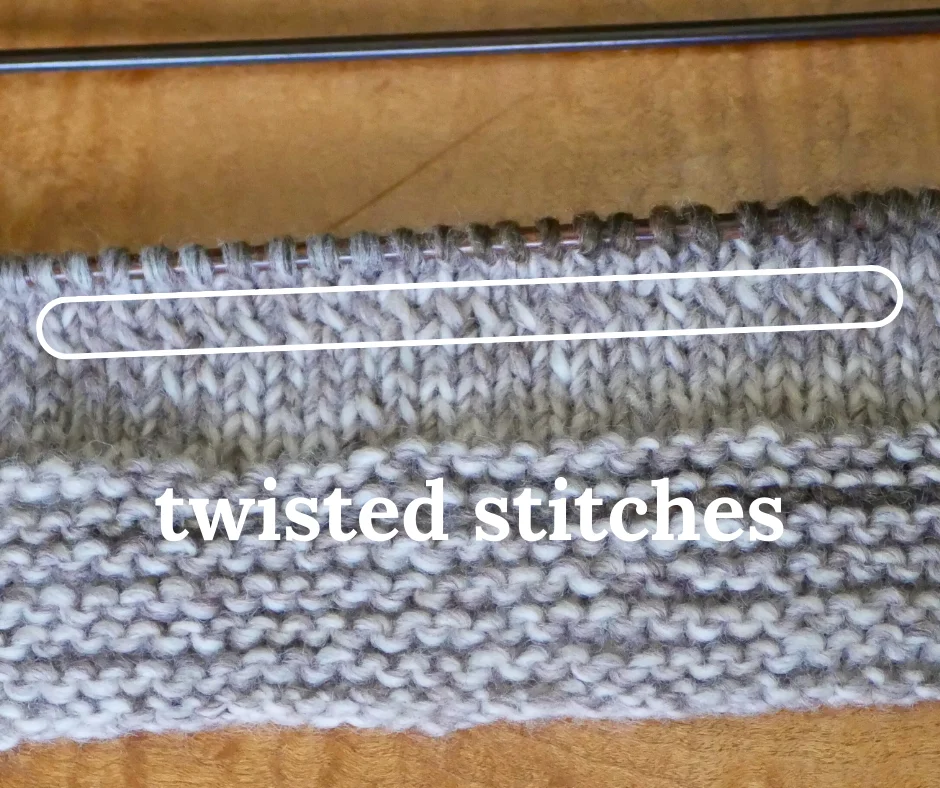
Twisted stitches aren’t a horrible thing. In some cases, you might even want to knit this way on purpose. It can give a nice decorative effect.
The key is to know if you are doing it or not. If you know you are doing it, and want to be doing it, great! If you are doing it and don’t want to be doing it, or do realize you’re doing it, then it can be a problem.
To help avoid unwanted twisted stitches, make sure the right leg of each stitch is in front of the knitting needle, and the left leg is behind the needle, and only knit into the front leg.
Joining in Yarn
To make a scarf long enough to wrap around your neck, you’ll need to add another ball of yarn (or two) into your scarf.
There are a lot of different ways to join in new yarn. The easiest one I’ve found is to knit the two yarns together for a few stitches.
When you reach the end of your current ball of yarn, but still have about 6-10 inches of yarn left, grab one end of your next ball of yarn.

Lay the new yarn next to your old yarn. The ends of each yarn should be going in opposite directions. Then knit a few more stitches with both yarns held together, then let go of the old yarn and keep going with the new yarn.

Be careful when you are knitting on the next row and make sure you knit the doubled yarn like it was single yarn.

At the end of your scarf, you can weave in the ends.
Cast Off
You’ll keep knitting back and forth, row by row, until the scarf is as long as you want it, or you are almost out of yarn.
Whenever you reach the point you want to finish your scarf, you’ll need to cast off your stitches. Casting off, or binding off, prevents your knitting from unraveling when you take it off the needles.
There are lots of ways to cast off your knitting, but for this project we will do a basic cast off.

To cast off, knit the first two stitches on a row, then use the tip of the left hand needle to slip the first stitch on the right hand needle over the second.
Then, knit the next stitch, and slip the second stitch on the right hand needle over the third.
Keep repeating this process until all of your stitches have been cast off. Then either break or cut your yarn and pull it through the last stitch.
For more information about easy cast offs, click here.
Now you’ve finished the actual knitting and its time for the last few steps.
Weave In Ends
With your scarf of the knitting needles, you’ll see there are yarn ends sticking out wherever a ball of yarn started or stopped.

Using a tapestry needle, gently sew the yarn ends into the ridges of the fabric so the are not haning loose. Make sure you work in at least 3 or 4 inches of yarn. Then, you can trim away any more excess yarn.
For more examples of weaving in ends, click here.
Finishing Touches
Just because this is a beginner knitting tutorial, doesn’t mean you can’t add a little personality to your scarf!
Tassels
A classic way to finish the ends of a scarf is to add a bit of fringe. Luckily, it’s pretty easy to do!

You’ll need some leftover yarn, if you want your fringe to match your scarf, or some other yarn, if you want to go for a fun contrast. Use what makes you happy!
Then, decide how long you want your fringe to be, then cut off bits of yarn that are at least twice that length.
I decieded on 4 inch tassels, so I cut off 9 inch pieces of yarn.
Tip for cutting a bunch of yarn to the same length quickly: get a piece of cardboard and cut it into a rectangle the same width that you want the length of your yarn. Then, gently wrap your yarn around the cardboard as many times as you want, and cut along the size of the cardboard.

Then, take a few pieces of yarn at a time, and fold them in half to make a loop. Using a crochet hook, pull the this loop through a stitch at the end of the scarf, then pull the ends of the yarn through the loop. Pull tight to secure. Repeat this process as many times as you want along each end of your scarf.

Once you’ve added all of your fringe, you can trim the ends of the yarn to even it out, or leave it as is if you like how it looks!
Cowl
If you’ve knitted all the yarn you have and feel like you don’t have a long enough scarf, you can turn it into a cowl!
Simply bring the ends of the scarf together and sew them together, either with some extra yarn or a bit of thread.

This way, you can get the maximum amount of warmth and squishy-ness around your neck!
Printable Beginner Knitting Tutorial
Learn to Knit Scarf - Beginner Knitting Tutorial

Follow this beginner knitting tutorial to guide you through everything you need to know to start knitting and make your own scarf!
Materials
- Yarn - at least 400 yards total, worsted weight (about 200 yards per 100 grams), in a color that you like, that feels nice against your skin, and isn't too fluffy.
Tools
- Knitting Needles - Either straight or circular needles, around a size 4.5mm/US7 to 8mm/US 11. (Sample knit on 6mm/US 10
- Tapestry Needle
- Crochet Hook around size 4mm/G to 6mm/J - optional
Instructions
Cast On
Using a long tail cast on, cast on about 30 stitches (more stitches = wider scarf)
Long Tail Cast On
Start with a slip stitch with about 18 inches of yarn end, and place the slip stitch on one knitting needle. Hold the needle with the slip stitch in one hand, with the tip of the needle facing the other hand. Drape the end of the yarn over the opposite thumb, and the working yarn over the pointer finger. Using the tip of the knitting needle, pull the working yarn through the loop around the thumb and pull tight.
Repeat until there are 30 (or your chosen number) stitches on your needle, including the slip stitch.
Knit
You'll have the knitting needle with all of your cast on stitches in your left hand, and your knitting needle without stitches in your right hand. You will knit into each cast on stitch.
To make a knit stitch, put the right needle into a loop on the left needle, wrap the yarn around the needle counter-clockwise, and pull a stitch through onto the right needle.
There are different knitting styles, but the two you will most commonly see in the US are English style and Continental style.
The difference between the two is which hand moves the yarn. With English knitting, the right hand moves the working yarn, and in Continental knitting, the left hand controls it. If you try one way and find that it doesn't feel right to you, try the other style and you may have better luck!
Once you have reached the end of your cast on stitches, you've knit your first row! Now turn the knitting needle with your knitting over, and knit the next row!
Keep knitting row after row until your scarf is as long as you want it, or you run out of yarn.
The first time you try to knit, you may not like your first few stitches. Remember, with yarn, you can always start over and try again. It will take practice to get even stitches, and that's ok!
Troubleshooting
Extra Stitches
Beginning of the Row
A common place to add extra stitches is at the beginning of a row. If you aren't careful, you can accidentally pull up the stitch from the previous row, which will look like two stitches instead of one.
To avoid this problem, make sure your working yarn wraps counter-clockwise, around the bottom of your knitting needle, not over the top. Gently pulling your knitting down, just under the first stitch, can make it easier to see if you have the working yarn going the right way.
If you do end up with a couple of extra stitches, your scarf will still be perfectly functional, but the edges might not be straight.
Yarn Overs
Sometimes, knitters can accidentally add a loop of yarn between two stitches, called a yarn over. This will look like a hole in your knitting.
If you notice that you added a yarn over a few rows back, you can leave it and call it a design choice! Just like before, the scarf will still be perfectly functional and hold together. No one will notice an extra stitch here or there. Every knitting project has a mistake somewhere. That's the beauty of handmade things!
If it really is bugging you, you can let the stitch above the yarn over drop, but you will end up with loose stitches where the yarn over stitches were.
The other option is to undo your knitting to the row before the yarn over, and knit it again.
Dropped Stitches
Sometimes stitches will fall off your needles without you knitting them. You'll notice you don't have as many stitches on your needles as you should, and there might be a gap where stitches have come undone, like a run in tights.
This is a bigger issue than extra stitches, because left unattended, this stitch will keep unraveling all the way down your scarf.
Here are a few ways you can take care of this problem.
Quick Pickup
If you notice your dropped stitch right away, you can quickly grab it with your knitting needles and keep going. Even if it was a row or two below where you are working, it won't be super noticeable, and it will keep the stitch from unraveling.
Crochet Hook
If the dropped stitch is several rows back, you can use a small crochet hook to grab it, and then loop it through the extra yarn on each row until you get back up to your needles. This will save your stitch and keep you from having to rip your stitches out. Your stitches might look a bit tighter where you pick up the dropped stitch.
You can also use your knitting needles to save a dropped stitch in the same way, but a lot of people find this harder to do than using a crochet hook. Remember, if it works for you, you're doing it right!
Tie It Off
Another option is to take a bit of your yarn, thread it through the stitch, and tie it off. Then, when you weave in ends, you can weave these in as well.
It is a fast fix, and keeps your knitting from unraveling.
Go Back
Like any other issue you run into, you can always undo your knitting and re-knit.
Twisted Stitches
Another common thing that happens accidentally with new knitters is twisted stitches.
This is when you end up knitting stitches with a small twist at the bottom. This usually happens if you knit off of yarn from the back of the knitting needle instead of the front.
Twisted stitches aren't a horrible thing. In some cases, you might even want to knit this way on purpose. It can give a nice decorative effect.
The key is to know if you are doing it or not. If you know you are doing it, and want to be doing it, great! If you are doing it and don't want to be doing it, or do realize you're doing it, then it can be a problem.
To help avoid unwanted twisted stitches, make sure the right leg of each stitch is in front of the knitting needle, and the left leg is behind the needle, and only knit into the front leg.
Joining in More Yarn
When you reach the end of your current ball of yarn, but still have about 6-10 inches of yarn left, grab one end of your next ball of yarn.
Lay the new yarn next to your old yarn. The ends of each yarn should be going in opposite directions. Then knit a few more stitches with both yarns held together, then let go of the old yarn and keep going with the new yarn.
Be careful when you are knitting on the next row and make sure you knit the doubled yarn like it was single yarn.
At the end of your scarf, you can weave in the ends.
Cast Off
Keep knitting until the scarf is as long as you want it, or you are almost out of yarn, then cast off your stitches.
Basic Knit Cast Off
Knit the first two stitches on a row, then use the tip of the left hand needle to slip the first stitch on the right hand needle over the second.
Then, knit the next stitch, and slip the second stitch on the right hand needle over the third.
Keep repeating this process until all of your stitches have been cast off. Then either break or cut your yarn and pull it through the last stitch.
Weave In Ends
Using a tapestry needle, gently sew any yarn ends into the ridges of the fabric so they are not hanging loose. Make sure you work in at least 3 or 4 inches of yarn. Then, you can trim away any more excess yarn.
Finishing Touches
Tassels
You'll need some leftover yarn, if you want your fringe to match your scarf, or some other yarn, if you want to go for a fun contrast.
Then, decide how long you want your fringe to be, then cut off bits of yarn that are at least twice that length.
The example scarf has 4 inch tassels, made from 9 inch pieces of yarn.
Tip for cutting a bunch of yarn to the same length quickly: get a piece of cardboard and cut it into a rectangle the same width that you want the length of your yarn. Then, gently wrap your yarn around the cardboard as many times as you want, and cut along the size of the cardboard.
Take a few pieces of pre-cut yarn and fold them in half to make a loop. Using a crochet hook, pull the loop through a stitch at the end of the scarf, then pull the ends of the yarn through the loop. Pull tight to secure. Repeat this process as many times as you want along each end of your scarf.
Trim the yarn ends to an even length, if desired.
Cowl
If you've knitted all the yarn you have and feel like you don't have a long enough scarf, you can turn it into a cowl!
Simply bring the ends of the scarf together and sew them together, either with some extra yarn or a bit of thread.
Now, wear your first scarf with pride!
You Did It!
Congratulations! You learned to knit and made a whole scarf! Take a moment to be proud of what you’ve accomplished, it’s a big deal!

Of course, this beginner knitting tutorial just barely scratches the surface of knitting, and there is a lot more to learn. This is a great foundation for you to continue to build off of, and add in new skills as you find other things you want to knit.
If you want to learn more knitting skills, click here.
If you run into trouble, or have any questions, please let me know in the comments below, and I will do my best to help!