Free Easy Crochet Earrings Pattern – Dragon Egg
Looking for the perfect summer accessory? Follow this easy crochet earrings pattern to make your own Dragon Egg earrings.

Please note that some of the links below are affiliate links, and I will earn a commission if you purchase through those links. I use all the products listed below and recommend them because they are companies that I have found helpful and trustworthy.
Why crochet earrings?
When you think about crocheting, earrings may not be the first thing that comes to mind. But yarn actually makes for the perfect customizable statement earring.
Depending on how fast you crochet and how complicated the pattern is, you can finish a pair of crochet earrings with as little as an hour of work. You can use different colors so they can match any outfit. They are an eye-catching accessory and I always get compliments when I wear them. They are extremely lightweight which makes them the perfect all-day earring no matter how big you make them. Not to mention these make the perfect gift for just about anyone!
Dragon Egg crochet earrings pattern
The Dragon Egg crochet earrings pattern is one of my favorite designs. The shape is flattering for any face. The finished size is just right – not too big and not too small. The base of the egg shape looks like scales, so I couldn’t help but think it might have a baby dragon hiding inside.
No matter what crochet skill level you have, this is a great project. There are no fancy stitches, even though the final result is impressive.
This is the perfect weekend project that you can wear for any occasion. For beginner crocheters, it is a fun way to practice, and for advanced crocheters, it is a quick project that will turn heads.
In this free crochet pattern, I have broken down what you’ll need, each step in making the crocheted earrings, and helpful tips and options along the way. As long as you know some basic crochet stitches, you’ll be able to crochet your own pair of earrings in no time!
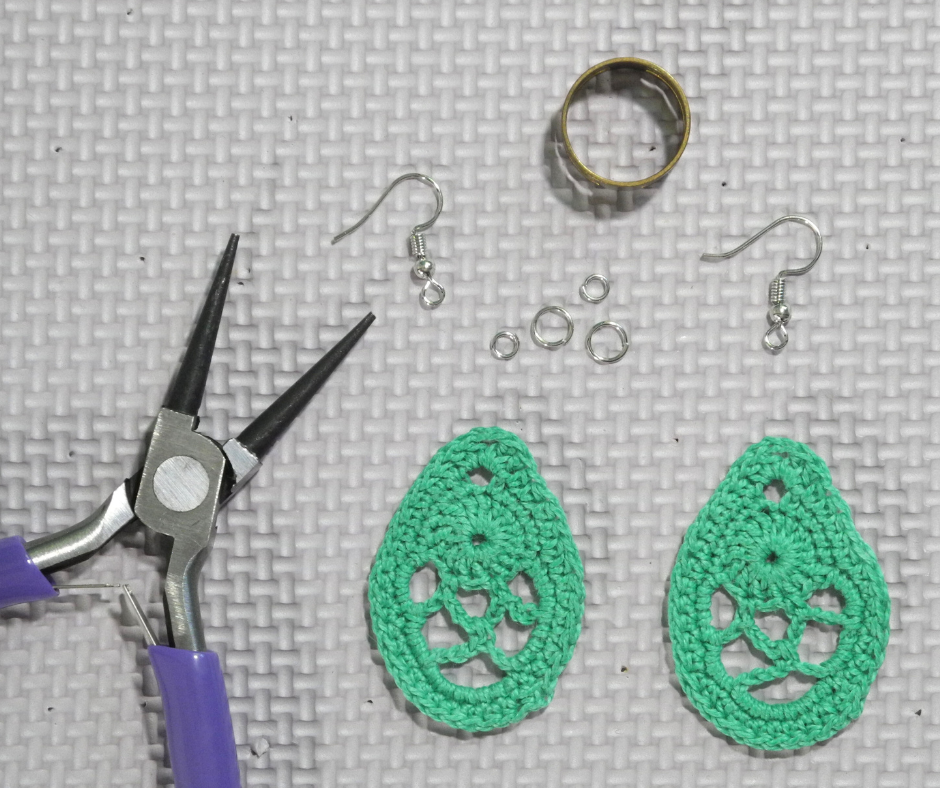
What you’ll need
One of my favorite things about this crochet earring pattern is it doesn’t need very many supplies. You’ll of course need some yarn and a crochet hook. I used #10 cotton crochet thread and a 1.0 mm hook. I like to use Curio #10 yarn from KnitPicks. You can use a variety of yarn or thread options. Embroidery floss would work well and comes in hundreds of different colors. You could adjust the crochet hook size up, which would make a bigger set of earrings.
Once you’ve finished crocheting, you’ll need a small tapestry needle to weave in the ends of the yarn so they don’t show. To firm up the earrings and make them hang nicely I use fabric stiffener liquid. Finally, you will need earring hooks, jump rings, and a pair of jewelry pliers.
Dragon Egg Crochet Earrings Pattern
Round 1
To start off the pattern, join a chain of five stitches into a circle with a slip stitch. This will be the base for the stitches in round 2.
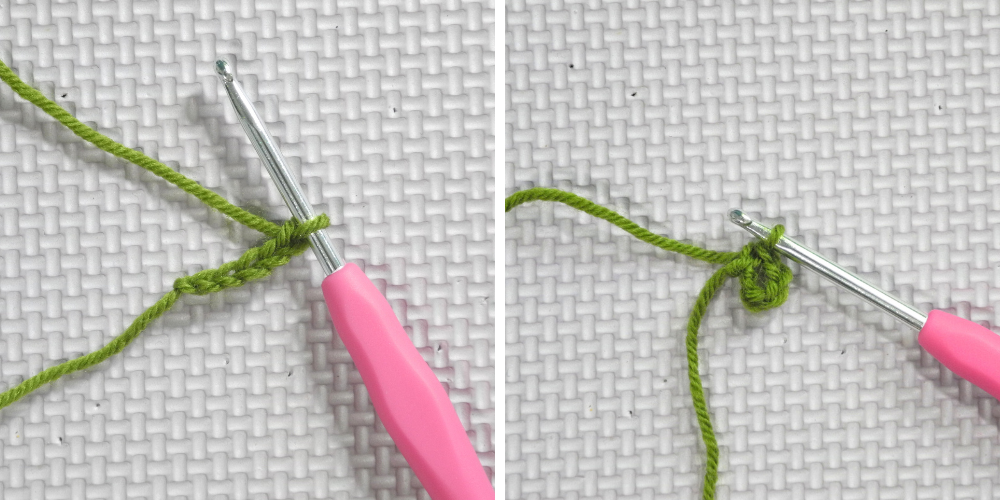
Round 2
Chain 2 to count as a double crochet.
Then double crochet 15 stitches, working into the center ring.
At the end of the round, join the last double crochet to the beginning of the round with a slip stitch in the top of the first double crochet.
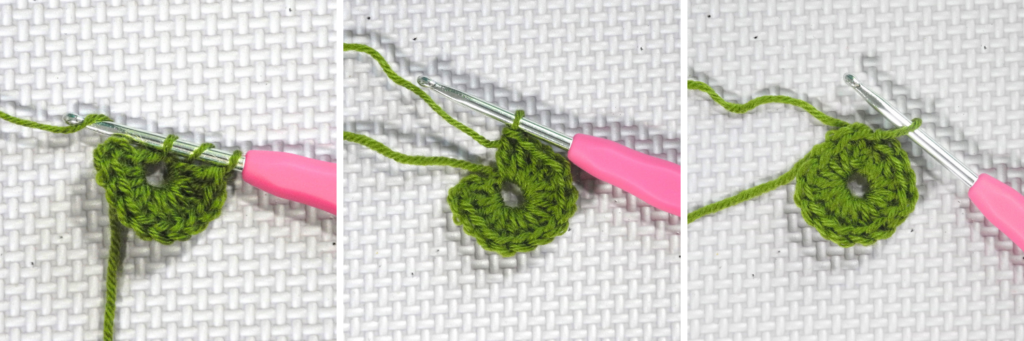
Round 3
Chain 6, then single crochet into the top of the next double crochet.
Then chain 6 again and single crochet into the top of the second double crochet from the last worked double crochet.
Next, chain 3 and triple crochet into the top of the second double crochet from the last worked double crochet.
This will create three loops across the bottom of the center circle which are the first three scales of the dragon egg.
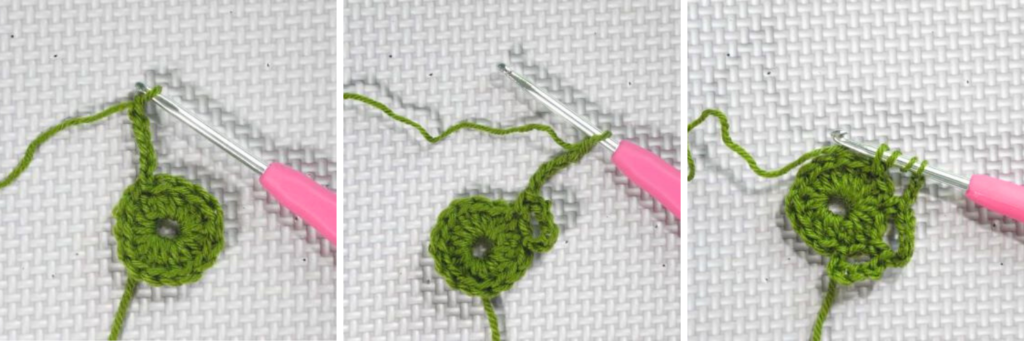
Round 4
Turn the earring over and chain 6. Single crochet into the middle scale that we made in round 3.
Chain 3 then triple crochet into the first scale we made in round 3. Now we have 5 scales.

Round 5
Turn the earring over again and chain 6 and single crochet into the second scale from round 4 to finish all the dragon scales.
Round 6
Single crochet 3 into the same chain space as the last single crochet worked in round 5.
Skip to the next chain space and single crochet 4.
Working into the top of the double crochets from round 2, single crochet 5 which will end up at the top of the circle from round 2.
Chain 4, then continue working around the double crochet circle, single crocheting into each double crochet 5 more times.
Skip to the next chain space and single crochet 4, then do the same for the next chain space.
In the final chain space at the bottom of the egg single crochet 8.
Join the last single crochet to the first single crochet with a slip stitch.

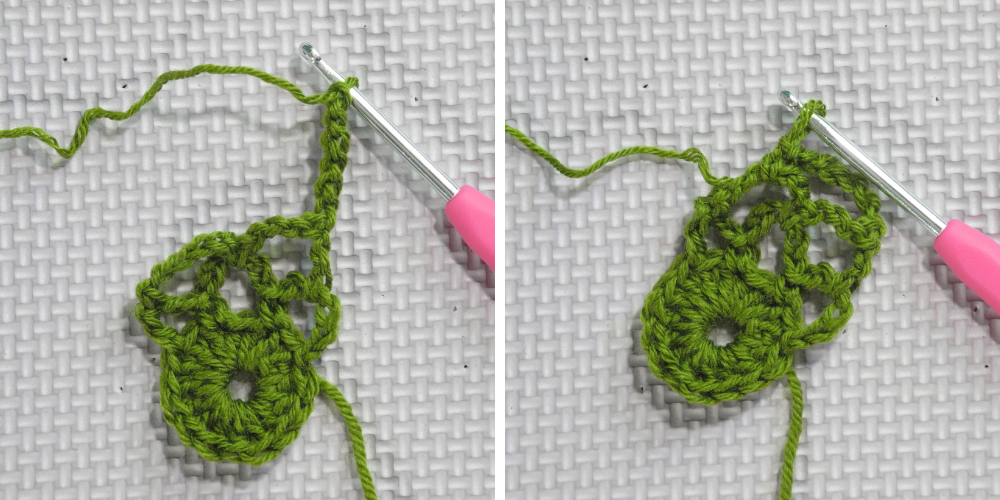
Round 7
The dragon egg crochet earring is almost done!
Chain 2 to stand in for the first half double crochet stitch.
Then work a half double crochet into the top of each single crochet until you reach the chain 4 space at the top of the dragon egg.
Double crochet 2, chain 2, double crochet 2 into the chain 4 space.
Then continue to half double crochet into every single crochet around the rest of the dragon egg.
Slip stitch into the first half double crochet, cut the yarn, and pull through to finish.

Crochet a second Dragon Egg earring to make a matching pair.
Weaving in ends
Now that you’ve finished all your crochet work, you will want to hide the loose ends of the yarn. You will need a small tapestry needle. This is a blunt needle with a large eye that you can use to pull the ends through the stitches on the earring. The tapestry needle you use needs to be small enough to slip through the crochet stitches.
For the starting end, I like to work it through the central double crochet circle once or twice then trim the end.

On the finished end, I loop the yarn through the outer crochet edge so it completes the pattern, then follow along the chain stitches under the single crochet stitches. Once I’ve worked it at least an inch or so I trim the edge.

You want to be sure you leave enough of a tail before you trim each end to make sure the stitches don’t come apart. But don’t worry too much because we will use fabric stiffener, which will help hold everything securely.
Stiffening the earrings
If you stopped here and added earring hooks to what you’ve crocheted you would have earrings that would not lay nicely and could get crumpled up. To prevent this, I use fabric stiffener liquid to make sure every stitch lays nicely and stays in place.
I use Aleene’s Stiffener and Draping Liquid. There are other options that could work like liquid starch or Mod Podge but I am not familiar with working with those, so you would have to use your best judgment. Whatever you choose, make sure it is something that will dry clear.
Aleene’s Stiffener and Draping Liquid is very similar to Elmer’s glue (which could also work). I dilute it about 50% with water to make it absorb nicely into the earrings. After mixing the stiffener and water thoroughly I soak the earrings in the liquid so they will harden evenly. When I take the earrings out of the liquid make sure to get off the extra liquid by patting it with a towel. If you don’t remove the excess you will get shiny spots where the stiffener dried on its own.
After getting the excess liquid off, you will need to lay the earrings on a flat surface to let them dry that won’t get damaged by the stiffening liquid. I have foam mats that work very well, but you can always cover a tray or plate with some saran wrap and lay them on that.
While the earrings are still damp, make sure they are laying the way you want them to look when they are dry.

When the crochet earrings look exactly how you want them, leave them alone overnight to dry.
Adding the earring hooks
Once your earrings are completely dry you can add the finishing touch, the earring hooks!
I use French hooks, which are easy to find, but you can use whatever kind of earring hook you like best.
To connect the hooks to the rest of the earring you will need jump rings. When I have purchased earring hooks, they have come with matching jump rings, but these can also be purchased separately. To make sure the earrings lay in the right orientation when they are worn I use 2 rings per earring.
Jump rings are designed to be opened and closed easily. They come with a jump ring opener with grooves you wear on your finger to help get a grip on the ring and apply the force to open them.
You will also need some small jewelry pliers. I have found round nose pliers work the best for me, but any small pliers will work.
With the jump ring opener on the pointer finger of my non dominant hand, I pick up the jump ring I want to open with the pliers, then put one side of the jump ring into the groove of the jump ring opener and gently twist it open.
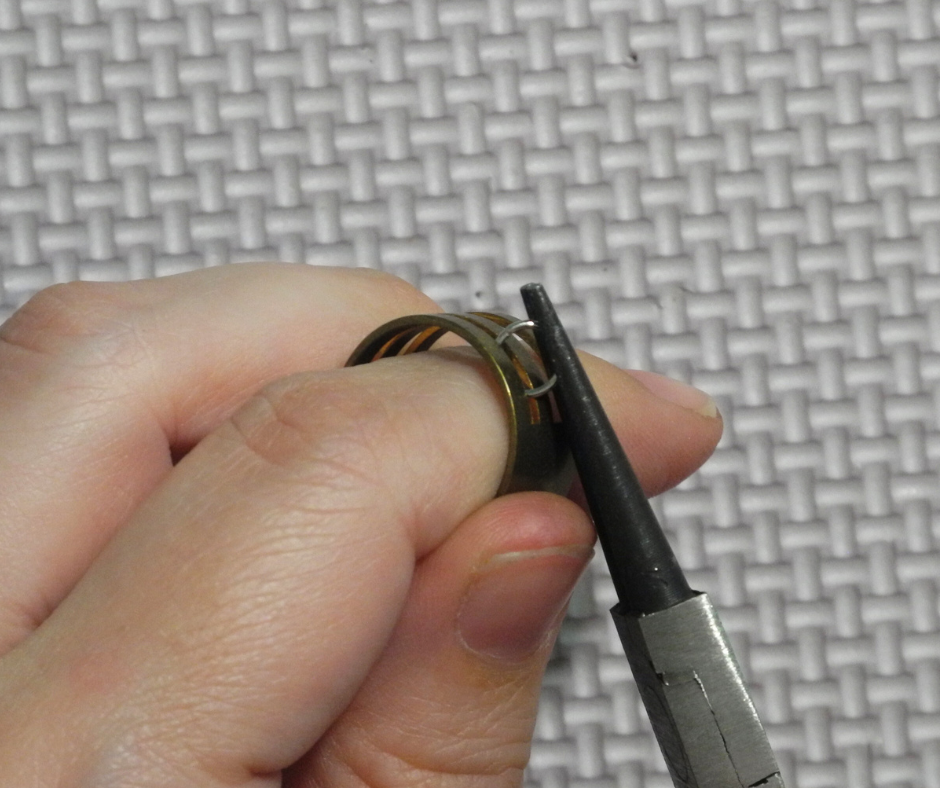
Once the jump ring is open you can use it to connect the hook with the chain 2 space at the top of the dragon egg earring. To close jump rings, just reverse the twist.
When you chain everything together, make sure the back of the earring hook lines up with the front of the crochet pattern so they will lay correctly.
Once you’ve added hooks to each earring you have finished your own pair of beautiful crochet earrings.

Free Printable Crochet Earring pattern
Free Easy Crochet Pattern - Dragon Egg Earrings

Looking to add a bit of fantasy to your wardrobe? Follow this easy crochet earrings pattern to make your own Dragon Egg earrings.
Materials
- 10 yards #10 cotton crochet thread
- 2 earring hooks
- Jump rings
- Fabric stiffener liquid
Tools
- 1.0 mm Crochet hook
- Small tapestry needle
- Small Pliers
- Jump ring opener
Instructions
Using 1.0 mm crochet hook and #10 cotton crochet thread crochet the earrings
Round 1:
Ch 5, sl st into 5th chain from hook to join
Round 2:
Ch 2, dc 15, sl st into top of first dc to join
Round 3:
Ch 6, sc into top of next dc from round 2 dc, ch 6, sc in into dc skipping 1, ch 3, tr into dc skipping 1
Round 4:
Turn work, ch 6, sc into middle ch 6 space from round 3, ch 3, tr
Round 5:
Turn work, ch 6, sc into other ch 6 space from round 4
Round 6:
Sc 4 into chain space, sc 4 into next chain space, sc 5 into next 5 dc from round 2, ch 4, sc 5 into next 5 dc from round 2, sc 4 into next chain space, sc 4 into next chain space, sc 8 into next chain space, join with sl st
Round 7:
Hdc into each sc from round 6 until ch 4 space, (dc 2, ch 2, dc 2) into ch 4 space, hdc into each sc from round 6 until end, join with sl st, break yarn and pull through
Repeat to instructions to crochet the second earring
Weave in ends with a tapestry needle and trim away extra yarn.
Soak earrings in stiffening liquid diluted with an equal amount of water. Pat earrings with a towel to remove any excess liquid. Lay earrings flat to dry.
When earrings are completely dry, attach earring hooks with jump rings and pliers, making sure the front of the earring will face the right direction when the earring hook is
attached.
Your Dragon Egg crochet earrings are ready to wear!
Notes
Abbreviations
Ch - chain
Sl st - slip stitch
Sc - single crochet
Hdc - Half double crochet
Dc - double crochet
Tr - triple crochet
Wearing your dragon egg crochet earrings
Now you are ready to add a touch of fantasy to your life!
This Dragon Egg crochet earrings pattern will quickly become a favorite in your jewelry hoard. They are comfortable enough for everyday wear, and great statement earrings for special events.
I have so much fun choosing color combinations of thread and earring wire metal to create the perfect statement piece for any outfit. These beautiful handmade earrings would also make great bride’s maid gifts, made to match the wedding colors.
I hope you have as much fun making and wearing these earrings as I have.
Happy crocheting!

If you want to see more crochet projects, click here.
Where would you wear your Dragon Egg earrings? Let me know in the comments below!
2 Comments